

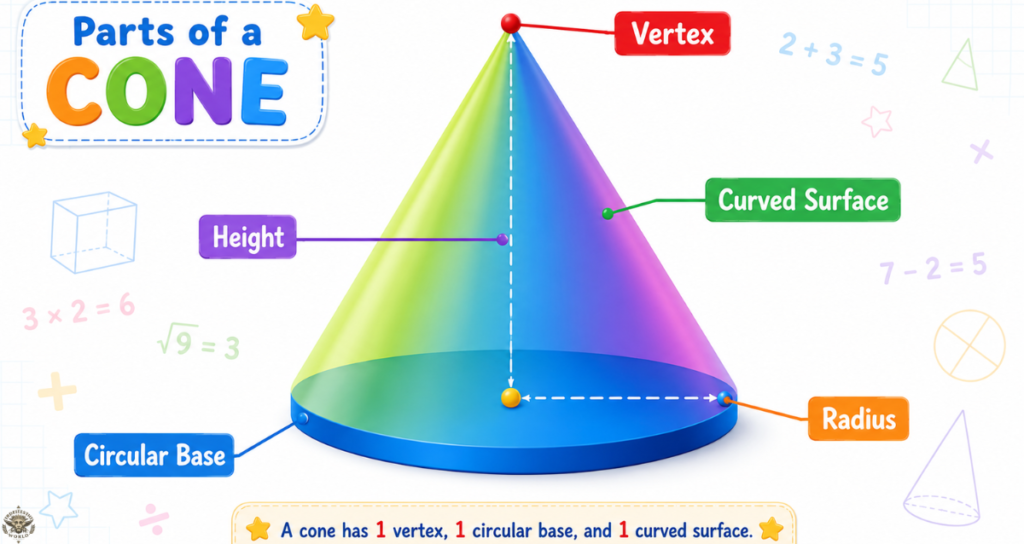
A cone is one of the first solid shapes young learners meet in math class, and it quickly becomes a favorite thanks to its familiar, everyday form. From an ice cream cone to a birthday party hat, a cone combines one flat circular base with a single curved surface that rises smoothly to a point, giving it a shape students can spot almost anywhere.
This guide breaks down everything a K-3 teacher needs to introduce a cone with confidence, from its basic attributes to its volume, its net, and simple ways to compare it with other 3D shapes. Whether a student is stacking, rolling, or tracing a cone for the first time, this page turns a cone into a shape they can describe, measure, and recognize with ease.
Understanding Cones In Mathematics
A cone is one of the most recognizable solid shapes in the K-3 classroom, and it shows up everywhere from ice cream cones to party hats to traffic cones on the street. Unlike prisms, which have two parallel bases, a cone has only one base and a single vertex, where the curved surface comes to a point. This combination of one flat face and one curved face is what makes the attributes of a cone so unique among 3D shapes.
Understanding cone attributes early helps students build a foundation for comparing and classifying solid shapes later on. When students can name the parts of a cone with confidence, they are better prepared to answer questions like “how many faces does a cone have” and to describe cone faces using precise math vocabulary.
Read More: Thirds – Meaningful Math
Key Concepts Related To Cones
A cone brings together several key ideas that build on one another, from its basic shape to its volume and net. Exploring these concepts one by one helps students form a complete, confident understanding of every cone attribute.
Attributes Of A Cone
The attributes of a cone describe the parts that make up the shape and give it its unique properties. When teachers walk students through cone attributes, it helps to break the shape down into its basic parts:
- Base: A cone has one circular base. This flat surface sits at the bottom of the shape and gives the cone its round footprint.
- Vertex: A cone has one vertex, sometimes called the apex, where the curved surface tapers to a single point.
- Curved surface: The curved side connects the edge of the circular base to the vertex. This curved surface is what allows a cone to roll.
- Edge: A cone has one curved edge, formed where the circular base meets the curved surface.
- Height: The height of a cone is the straight-line distance from the base to the vertex.
- Slant height: The slant height is the distance measured along the curved surface from the edge of the base to the vertex.
- Radius: The radius is the distance from the center of the circular base to its outer edge.
Teaching the attributes of a cone as a checklist like this gives students a repeatable way to examine any solid shape, not just a cone. Once students can list cone attributes on their own, they can apply the same thinking to cylinders, cubes, and pyramids.
How Many Faces Does A Cone Have?

One of the most common questions students ask is, “How many faces does a cone have?” A cone has exactly one flat face, which is the circular base, and one curved surface. Some classrooms count the curved surface as a face and some do not, so it is worth discussing both views with students. In the strictest sense, a cone has one face (the circular base) plus one curved surface, one vertex, and one edge.
This question about cone faces is a great discussion starter because it pushes students to think carefully about the difference between a flat face and a curved surface. A cube has six flat faces, a cylinder has two flat faces and one curved surface, but a cone has only one flat face. Comparing cone faces to the faces of other solid shapes helps students see why the attributes of a cone make it different from every other 3D shape in the classroom shape bin.
Comparing Cones To Other 3D Shapes
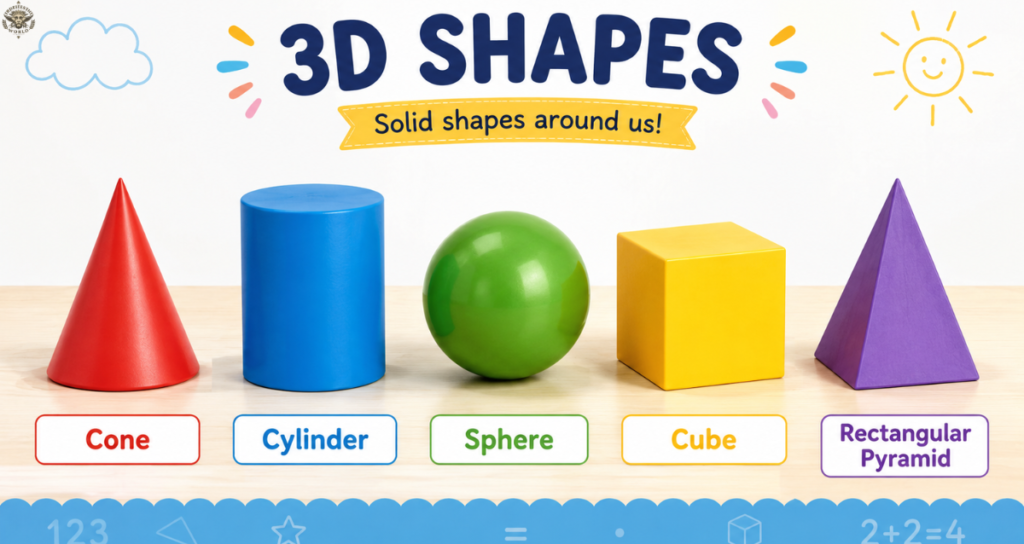
Encouraging students to compare and classify cones alongside other 3D shapes, such as rectangular prisms, cubes, cylinders, pyramids, and spheres, helps them recognize key similarities and differences. For example, a cone and a cylinder both have circular bases, but a cone tapers to a point while a cylinder has two parallel bases of equal size. A cone and a pyramid both come to a single vertex, but a pyramid has flat triangular faces while a cone has one curved surface.
Here is a simple way to frame the comparison for students:
| Shape | Number Of Faces | Number Of Vertices | Curved Surface? |
| Cone | 1 flat face | 1 vertex | Yes |
| Cylinder | 2 flat faces | 0 vertices | Yes |
| Sphere | 0 flat faces | 0 vertices | Yes |
| Cube | 6 flat faces | 8 vertices | No |
| Rectangular Pyramid | 5 flat faces | 5 vertices | No |
A chart like this makes the attributes of a cone easier to remember because students can see cone attributes side by side with the attributes of related solid shapes.
Cones And Volume
A cone’s volume is found using the formula V = ⅓πr²h, where r is the radius of the circular base and h is the height of the cone.
FUN FACT: A cone’s volume is actually one-third of the volume of a cylinder with the same base and height! Students can test this fun fact hands-on by filling a paper cone with rice or sand and pouring it into a cylinder of the same base and height. It takes exactly three cone-fuls to fill the cylinder, which brings the volume formula to life. This hands-on activity also reminds students that volume is just one more attribute of a cone worth exploring, alongside faces, edges, and vertices.
The Net Of A Cone
A cone’s net consists of a sector, which forms the curved surface, and a circle, which forms the base. Understanding the net of a cone helps students visualize how a curved 3D shape can be represented using flat surfaces. When students fold the sector into a curved shape and attach it to the circle, they recreate the cone attributes they already know: one base, one curved surface, and one vertex where the sector’s point comes together. Building a net is one of the clearest, most hands-on ways to confirm cone faces without any guesswork.
Real-Life Examples Of Cones
Grounding cone attributes in real objects helps students transfer classroom learning to the world around them. Common examples of cones include:
- Ice cream cones
- Party hats
- Traffic cones
- Funnels
- Megaphones
- Christmas trees (as a rough approximation)
- Certain roof shapes on buildings
Asking students to spot cones during a nature walk or a walk around the school building reinforces cone faces and cone attributes in a meaningful, memorable way. Every time a student points to a real cone and names its base, its vertex, or its curved surface, they are practicing the attributes of a cone without even realizing it.
Right Cones Versus Oblique Cones
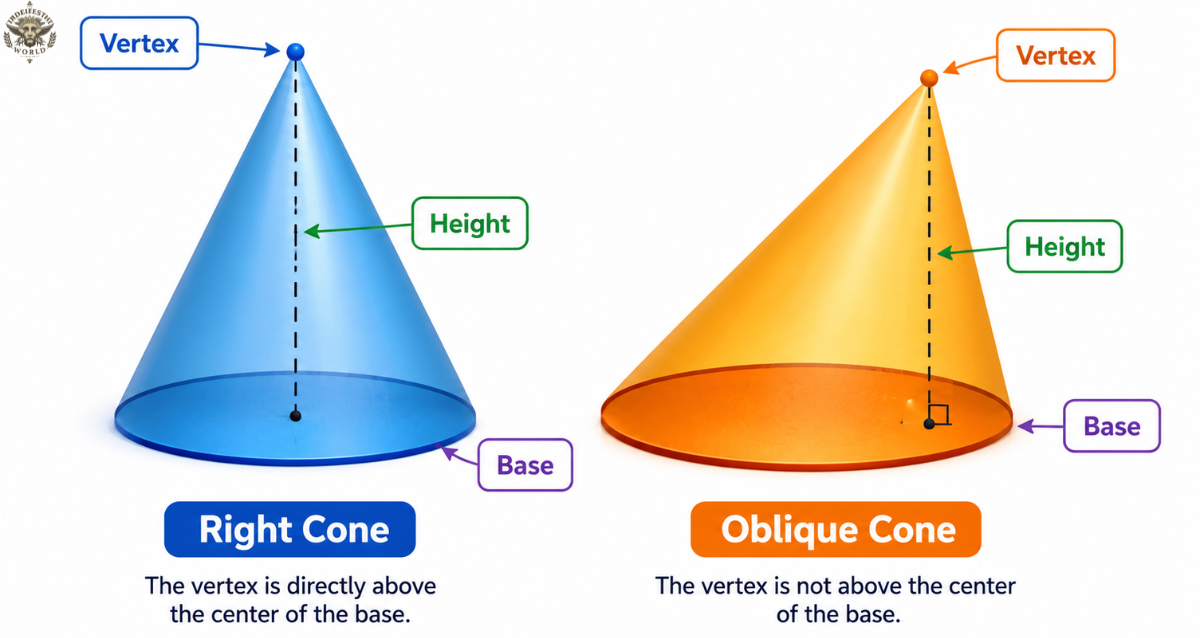
Most classroom examples focus on right cones, where the vertex sits directly above the center of the circular base. In an oblique cone, the vertex is off to one side, so the shape looks like it is leaning. Both right cones and oblique cones share the same basic attributes of a cone: one circular base, one curved surface, and one vertex. Pointing out oblique cones alongside right cones helps advanced students understand that cone attributes stay consistent even when the overall shape looks tilted. No matter how a cone leans, the count of cone faces never changes: it is always one flat base and one curved surface.
Teaching Strategies For Cone
Teaching a cone well works best when students get to touch, sort, and build the shape themselves, not just look at a picture of one. These hands-on strategies turn cone attributes into something students discover on their own, through comparison, visual matching, and net-building activities.
Comparing And Identifying Cone Attributes
Provide students with a set of 3D shapes, including cubes, rectangular prisms, cylinders, pyramids, cones, and other common solids. Encourage them to explore these shapes by handling, stacking, sliding, and rolling them to identify their key attributes. Guide their observations with questions like:
- Which shapes stack easily? Why?
- Which shapes roll? What do they have in common?
- Which shapes can slide but not roll?
- How many faces does a cone have compared to a cylinder?
- What cone attributes make it roll in a circle instead of a straight line?
Invite students to describe their observations, focusing on faces, edges, and vertices as defining features. Then have students sort the shapes into groups based on shared characteristics. Prompt them to compare:
- How is a cone different from a cylinder?
- Does a cone stack easily? Why or why not?
- Which shapes have curved surfaces, and which have flat faces?
- How is rolling a cone different from rolling a sphere?
- Why does a cone roll in a circle instead of rolling straight, based on its attributes?
Recording these attributes of a cone in a class comparison chart gives students a reference point for future geometry work. Revisiting the chart throughout the year helps students remember cone faces and cone attributes long after the initial lesson.
Visual Models Of Cones And Other 3D Shapes
Provide students with printed images or physical cutouts of different 3D objects, such as dice, ice cream cones, boxes, soup cans, and party hats. Ask students to match each image to a 3D shape model, prompting questions like, “Which of these looks like a cone? Which looks like a cylinder?” This matching activity reinforces recognition and builds shape vocabulary around cone attributes.
Next, encourage students to sort the objects based on specific attributes, such as the presence of flat faces, curved surfaces, or pointed vertices. Guide students in using precise language: “These all have curved surfaces,” or “These shapes have both flat and curved faces.” This helps students begin to categorize shapes by their structural features, not just their appearance, and reinforces how many faces does a cone have compared to the objects around them.
To further develop visual reasoning, invite students to trace around the base of real cones or cylinders to explore the 2D shapes that make up the flat faces of 3D objects. Discuss how the traced shape connects to what they know about faces, and ask students to predict what other faces they would see if the object were cut or unfolded.
This progression, from matching real objects to analyzing attributes and tracing parts, helps students build stronger 2D-to-3D connections and deepens their understanding of how solid figures are constructed and represented. It also gives students repeated, low-pressure practice naming the attributes of a cone in their own words.
Exploring Cone Nets
Give students various net templates, some that form a cone and some that do not. Before assembling, ask students to examine each net and predict which ones will fold into a cone. Encourage them to justify their predictions based on what they know about the shape of a cone’s surface and base. Then, allow students to test their ideas by cutting, folding, and assembling the nets.
As students reflect on their observations, prompt deeper reasoning with questions such as, “How does the cone change when the size of the curved sector changes?” or “Is this the only net that will form a cone? How do you know?” These discussions help students think critically about properties such as curvature, surface area, and symmetry, all of which connect back to the core attributes of a cone.
Counting Faces, Edges, And Vertices Together
A hands-on way to reinforce cone faces is to have students build a table that tracks faces, edges, and vertices for every solid shape in the classroom collection. When students reach the row for a cone, ask the class directly: “How many faces does a cone have?” Have students point to the flat circular base and the curved surface separately so they can explain their answer out loud. This routine turns an abstract question about cone attributes into a concrete, repeatable classroom habit that students can apply to any new solid shape they meet.
Cone Ice Cream
An ice cream cone is one of the easiest, tastiest ways to introduce the attributes of a cone to young learners. The wafer holds a circular base at the top, a single curved surface running down the sides, and one pointed vertex at the bottom, which is exactly what makes a real 3D shape cone rather than a flat drawing of one. When a teacher hands a student an ice cream cone and asks them to point out the base, the curved surface, and the vertex, the abstract idea of cone attributes suddenly becomes something a student can hold, turn, and examine from every angle.
Using an ice cream cone as a teaching prop also opens the door to questions about cone faces in a low-pressure, everyday context. Students can compare how the cone rolls on a table because of its curved surface, just like it would if it were made of paper or plastic in the classroom shape bin. Tying a familiar snack to the math vocabulary of faces, edges, and vertices helps the attributes of a cone stick in a student’s memory long after the lesson ends.
What Is Cone In Maths
In maths, a cone is defined as a solid 3D shape that has one flat circular base joined to a single vertex by a curved surface. This definition sits at the heart of every lesson on cone attributes, because it names the three parts, base, curved surface, and vertex, that every cone must have, no matter its size or how it is oriented. Unlike prisms and cubes, which are built entirely from flat faces, a cone tapers smoothly from a wide circular base to one pointed vertex, which is what gives it its distinct, curved silhouette.
Teachers often introduce this definition before diving into cone attributes so students have a clear mental picture before they compare a cone to other solid shapes, such as cylinders, spheres, cubes, and pyramids. Once students can explain what a cone is in maths using their own words, they are ready to tackle harder questions like how many faces does a cone have, why a cone rolls the way it does, and how the net of a cone unfolds into flat surfaces.
Cone Surface
A cone has two kinds of surface: one flat circular base and one curved surface that wraps around and rises to the vertex. This curved surface, sometimes called the lateral surface, is the defining feature among the attributes of a cone, since it is what separates a cone from flat-faced shapes like cubes and rectangular prisms. Because this surface is curved rather than flat, a cone can roll smoothly across a table in a circular path, tracing out the radius of its own base as it moves.
Understanding cone surfaces also helps students calculate surface area later on, since the total surface area of a cone combines the flat area of the circular base with the curved area of the lateral surface. Talking through cone surfaces with real cones, party hats, or paper models gives students a tactile sense of curvature and symmetry, two ideas that come up again and again when comparing cone attributes to the attributes of cylinders and spheres.
Cone Formula
The most common cone formula students learn in the K-3 classroom is the volume formula, V = ⅓πr²h, where r stands for the radius of the circular base and h stands for the height of the cone. This formula ties directly back to the attributes of a cone, since both the radius and the height come straight from the shape’s basic parts: the circular base and the straight-line distance up to the vertex. Older students may also encounter the surface area formula, which adds the area of the circular base to the area of the curved surface.
Practicing the cone formula alongside hands-on activities makes the math feel less abstract and more connected to real cone attributes. For example, filling a paper cone with rice and pouring it into a cylinder of the same base and height shows students, without a single calculation, that a cone’s volume is one-third of a cylinder’s volume. This kind of hands-on proof helps the cone formula make sense long before students are asked to plug numbers into it on a worksheet.
Cone Edges
A cone has just one edge, and that single curved edge is one of the more surprising attributes of a cone for students who are used to counting straight edges on cubes and rectangular prisms. This curved edge forms exactly where the flat circular base meets the curved surface, tracing the full circumference of the base. Unlike a cube, which has twelve straight edges, a cone’s one edge curves all the way around instead of running in a straight line.
Counting cone edges alongside faces and vertices gives students a complete picture of cone attributes and prepares them to answer related questions, such as how many faces does a cone have or how a cone compares to a cylinder, which also has one curved edge at each of its two flat faces. Asking students to trace the edge of a real cone with a finger is a simple, effective way to make this attribute concrete rather than abstract.
Cone Sports

Cones show up constantly in sports and physical education, and they offer a fun, active way to reinforce cone attributes outside the math classroom. Bright orange or yellow field cones mark boundaries, set up agility drills, and guide soccer, football, and track practices, and every one of those cones still has the same circular base, curved surface, and single vertex that students learned about in math class. Running drills around cones gives students a physical, memorable connection to the shape long after the lesson is over.
Physical education teachers can even turn a cone drill into a quick geometry review by asking students to describe the cone attributes of the very cones they are running around. Questions like “how many faces does a cone have” or “why does this cone stay upright on its base” tie sports vocabulary directly back to math vocabulary, showing students that these attributes are not just confined to a textbook.
Cone Food
Beyond ice cream, plenty of everyday foods are shaped like cones, and pointing these out helps students recognize cone attributes in the world around them. Waffle cones, sugar cones, and even rolled tortilla chips share the same basic structure: one circular base, one curved surface, and one vertex where the shape comes to a point. Snack foods like this give teachers an easy, no-cost way to bring real cone attributes into a lesson without needing special classroom materials.
Asking students to bring in or draw pictures of cone-shaped food for a class discussion builds vocabulary around cone attributes while keeping the lesson light and engaging. It also reinforces cone faces in a memorable way, since students can physically see that a cone-shaped food item has only one flat face, the base, compared to a cube-shaped cracker with six flat faces.
Types Of Cone
There are two main types of cones that students encounter once they move beyond the basic attributes of a cone: right cones and oblique cones. A right cone has its vertex positioned directly above the center of the circular base, which gives it a perfectly symmetrical, upright appearance. An oblique cone has its vertex shifted off to one side, so the shape leans, even though it still has the exact same attributes of a cone as a right cone: one circular base, one curved surface, and one vertex.
Introducing both types of cone helps students understand that cone attributes stay fixed even when the overall shape looks different from what they expect. Whether a cone stands straight or leans to one side, the count of cone faces, edges, and vertices never changes, which is a powerful lesson in looking past appearances to focus on the true structural features of a shape.
Frequently Asked Questions
What is the definition of a cone?
A cone is a solid 3D shape with one flat circular base that tapers smoothly to a single vertex through a curved surface.
How many faces do cones have?
A cone has one flat face, its circular base, plus one curved surface that wraps around and rises to the vertex.
What is in a cone?
A cone is made up of a circular base, a curved surface, a vertex, and the height and radius that define its size.
What are three types of cones?
The three main types are right cones, oblique cones, and truncated cones, which lose their vertex when the top is sliced off.
What is a 5 example of a cone?
Five everyday examples of a cone are an ice cream cone, a party hat, a traffic cone, a funnel, and a megaphone.
Conclusion
Cones show up everywhere, from the ice cream cone in a student’s hand to the traffic cone on the street, which makes them one of the easiest 3D shapes to teach and remember. Once students can name the attributes of a cone with confidence, base, curved surface, vertex, and edge, they carry that same thinking into every other solid shape they meet, from cylinders to pyramids.
Teaching cone attributes through hands-on activities, real-world examples, and simple questions like how many faces does a cone have gives students a lasting, practical grasp of geometry. That strong foundation in cone faces and cone attributes pays off well beyond the math dictionary page, shaping how students see and describe the world around them.

